


Troy University Athletics
I'm Putting on a Taping Clinic
9/11/2008 5:00:00 AM | General

Thursday, September 11
I'm in a great mood today and nobody has made me mad or upset and I got to wear my rain boots at practice yesterday in the rain...just to set the record straight.
We've had a few good days of practice and are looking forward to playing this Saturday in front of an awesome and energetic home crowd at 6 p.m. in Movie Gallery Veterans Stadium against Alcorn State.
We've whittled the daily injury report down to the bare minimum and are happy to have been able to do so with a few days off since the postponement of the LSU game. I will say that a scare of cholera made it through the team last week, but we were able to get it under control with no problem. (Just ask me about it and I'll be glad to tell you.)
There are many things I do in a day's time here at work. Clinic work in the morning is evaluation and treatment of injuries as well as computer work. I've been dubbed the "Technology Guru" by default and have spent the past week transferring files on a floppy disk (yes they still exist!) from an OLD laptop to our new one.
The riddle would go something like this: How long does it take to transfer word pad documents and spreadsheets for each of the student athletes for the past eight years if the old computer can't access the internet, doesn't have a CD burner or jump drive access, and the only common entry method between the two is a floppy drive? Answer: A LONG TIME!
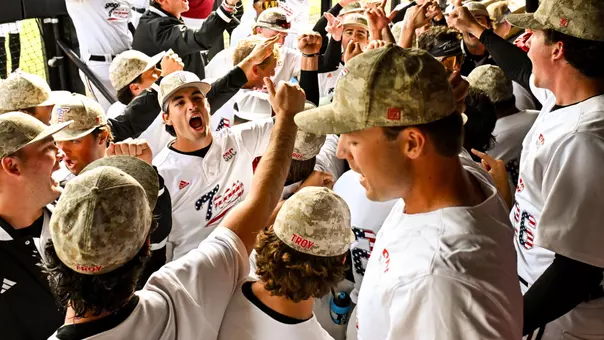
When practice time rolls around, all the football athletic training staff converges on the athletic training room in the basement of the field house for set up and taping. The smell there is indescribable! I can guarantee that you won't find a candle with the "Eau de 120 football players' feet" anywhere in the retail candle market!
Thank your lucky stars that's the case...it will take your breath away. And, although I've been told that a time or two...a long time ago...I hope it wasn't for the same reason!
Taping is the foundation of our daily jobs as athletic trainers. It may even be what we do the most of. Whether it's an ankle the size of a tree trunk, a wrist, or hand, it has to look nice. For it to look nice, it can't have any wrinkles. Not only does a smooth tape job work better, it minimizes the ever-pesky blisters (see the archived blogs for more blister helpful hints).
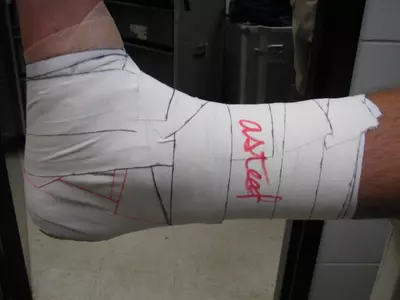
So, today I'd like to share with you how to tape an ankle. I've had coaches ask in camps about this and it's hard to grasp it having been shown only one time. There are quite a few steps and you'll see that there are about 22 pieces of tape involved, of which only three make continuous trips around the ankle without being torn.
This is a basket weave technique and it may not be just like one you've seen elsewhere, but it's mine and it's been working for me for at least 2,000 ankles or so (one of which was Mookie Moore in the early 1990's who has played in the NFL). These three pictures show spraying the ankle with QDA
 (a sticky substance that allows the pre-wrap to adhere to the skin), application heel and lace pads (squares with skin-lube on them to protect sensitive areas from friction), and rolling on pre-wrap (for everyone but James Searcy who thinks pre-wrap is for babies!).
Pre-wrap keeps the tape from the skin and prevents b listers and tape burn. We will omit the pre-wrap in
 certain cases to get the best skin adherence from the tape. I don't think they had pre-wrap when the 1968 NAIA National Championship team played...I'll have to ask Chuck.
Anchor strips on top and bottom give a base for the stirrups and horseshoes to attach.
 Stirrups are pulled from inside-out and parallel to the
 ground. Think cowboys on horseback. Most people have slightly supinated feet
at rest (bottoms of feet face each other when sitting with knees straight).
This widens the lateral portion of the ankle and increases the risk of a lateral
ankle sprain. By pulling inside-out with the stirrups, you attempt to put them
in neutral or somewhat pronated state. Just trust me on this.
ground. Think cowboys on horseback. Most people have slightly supinated feet
at rest (bottoms of feet face each other when sitting with knees straight).
This widens the lateral portion of the ankle and increases the risk of a lateral
ankle sprain. By pulling inside-out with the stirrups, you attempt to put them
in neutral or somewhat pronated state. Just trust me on this. 
 The horseshoe is perpendicular to the ground and to the aforementioned stirrup. You need to be careful with these or you will definitely inflict blisters on the backs of the heel! Again, trust me...
This shows the ankle after two rounds of each: top and bottom anchors, stirrups and horseshoes.

 One more round of each and make sure there's no skin showing through in gaps. If there is, which there isn't any here (yay, me!) close them up with small pieces of tape to have a closed base for the next two steps. That way, if you have to undo some of the next steps because of tightness, you won't mess up what you've already done.

 This is just to show you how fast I can do it!
These are known as heel locks and they do what the name says: lock the heel (calcaneus for the over-achievers) in place. They are not to be taken lightly and are the source of much angst in the ranks of the student athletic trainers learning how to tape. Angles are everything and the landmark that works best for me is the medial malleolus (you'll have to look that one up yourself).
Two sets of heel locks completed and only a few steps remain. You should see a diamond on the back of the foot when the tape job is complete where the heel pokes out if you've done these two steps correctly.
Figure 8's go in a three-dimensional 8 pattern around the ankle and foot if you're looking from the top of the foot. I do two in succession without stopping.  Then I start at the top and work my way down covering all the tape and put a strip at the bottom to finish it off. It should be nice and neat and wrinkle free in case the athlete's mom stops by. The signature is completely optional, but Austin Silvoy demanded it!
Austin Silvoy was the foot model for the day and could only say good things about the end result. Too much of a good thing is usually bad, I've been told. And for that reason, I'll have to let Austin go back to his normal ankle taper tomorrow so as not spoil him...he'll be back though! They always come back!
Just in closing, a few last comments: A common mistake made by amateurs is wrapping continuously around the ankle and foot until the foot turns bluish-purple. In fact, an effective tape job is a group of strategically placed strips of tape each working together in the whole tape job, as I've demonstrated for you today.
A good tape job is not mastered by knowing the steps, but practicing them many, many times. Then, when you think you're really good, do it blind folded and in under two minutes!
Call me when you've got it blind folded and in under two minutes and I'll put you to work!
GO TROJANS...See you Saturday at the Gallery!
Alyson